How to Use Spelling Fluency Practice to Improve Accuracy
Every year, you will have students who struggle to spell high frequency words. Students who need additional support and practice. Students who don’t respond to traditional methods.
In my last post, I talked about a trusted Orton Gillingham practice, Spelling Fluency, that was an essential component of my spelling instruction. If you’ve searched for a better way to teach sight words or high frequency words, Spelling Fluency is for you!
Today I want to talk with you about HOW to put Spelling Fluency into practice in your classroom.
This post contains affiliate links, which means I will earn a small amount should you make a purchase using one of the links at no extra cost to you. The earnings help cover the cost of this site.
Why Use Spelling Fluency Practice in your classroom?
There are two things you need to think about before putting any fluency practice into place.
First - decide its purpose for your students. I used Spelling Fluency as a tool for students to learn high frequency words - the “rule breakers” or those that followed rules my students had not yet learned. Fluency practices can also be used to reinforce words, rules, or patterns students have a difficult time remembering.
Next - consider how much time you can devote to fluency practices. In order to see the full benefit, Spelling Fluency should be used at least twice per week, with three or more times being ideal.
The components of a Spelling Fluency practice
In order for your Spelling Fluency practice to be effective and easy to implement, you need to have all of the components in place before you begin. This resource, available in my TPT store, provides you with all you need to implement Spelling Fluency practice in your classroom.
1. The Materials
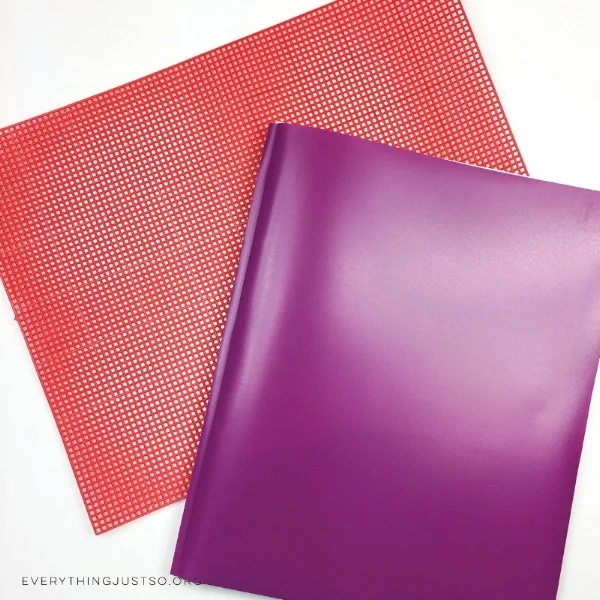
Each student receives a two-pocket folder with prongs. Inside the folder are a graphing chart with words to learn, words cards in an envelope, and practice pages. If you can, I recommend purchasing plastic folders that can be reused each year. I’ve found that 6x9 manila envelopes work best and last all year!
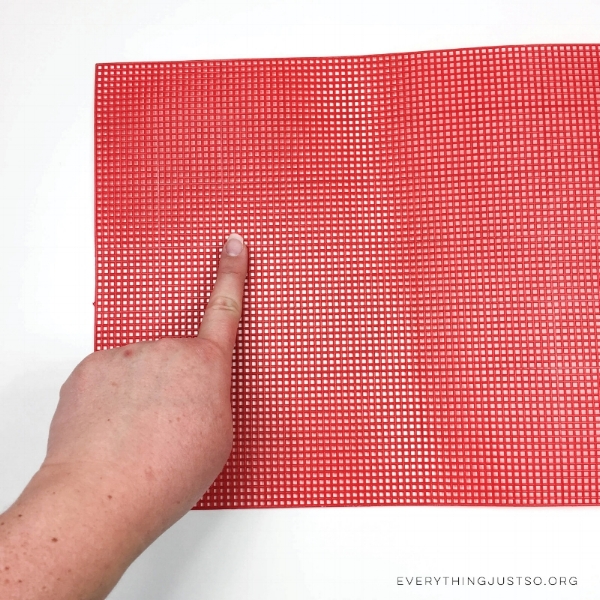
You will need one spelling mat for every two students as partners will share one during practice. I’ve always used red plastic, canvas sheets, but any type of textured material will work. Rubber cabinet liners, burlap, or velvet would also work well. Students will trace their words on the mat using their fingers, incorporating several senses at once.
2. The Word Lists
Each student receives a list of words to master. Your decision about what words to include - rule breakers, pattern words, or both - is determined by the purpose you decided upon. Students receive word cards to use during practices. Each card features one word and a sentence containing that word.
Determining which words appear on each student’s list is simple.
Obtain a baseline for each student by giving your class a Spelling Assessment.
Add every word each student misses to their personal Fluency Practice Charts.
Students start with the first ten words on their lists.
Words stay on a student’s list until they are mastered - meaning a student is able to correctly spell the word independently ten times.

3. Partners
Students work with partners during Spelling Fluency practices. Partners can change every month or stay together all year, whatever you determine works best for your students. It works best if a student is partnered with a classmate whose list is close to their own. This allows students to have additional exposure to the words they are working on.
The steps of Spelling Fluency
Each Spelling Fluency session includes a warm up and three rounds of practice. I model the entire practice and have the class go through each step together until they are able to do it independently. Incorporating teacher and peer modeling helps students learn the process quickly.
Let’s walk through what Spelling Fluency practice looks like from start to finish.
1. Warm Up
Partners bring their folders, pencils, and one spelling mat to their work area. They sit facing each other.
Students work independently to practice their own words. Each student takes their ten words out of their envelope. Starting with the first words, the student reads the word and the sentence to themself. They say the word, spell it out loud, and repeat the word. The student then moves on to the next word and repeats the procedure.
Students write their words in the first column of their practice sheets. They copy each word straight from their word cards to ensure they are spelled correctly. When finished, students fold back the first column so it can no longer be seen.
Students decide who will be the “teacher” and who will be the “student.” The student gives their card pile to the teacher and the student pulls out the spelling mat.


2. Practice Rounds
The teacher holds the card pile so the student can’t see it. The teacher reads the first word and the student repeats the word. The teacher then reads the sentence and repeats the word.
The student says the word again and begins the spelling procedure. First, they say each letter out loud while using the pad of their index finger to “write” as large as possible on the mat.
When the student has said and written the last letter of the word, they say the word again while underlining it, swiping their finger from the left side of the mat to the right.
If a student has spelled the word correctly, the teacher gives positive feedback and tells them to write it on their practice page. The student picks up their pencil and writes the word in the second column while saying each letter out loud. When finished, the student repeats the word one last time and then places a check next to that word.
If the student has misspelled the word, the teacher kindly tells them that is incorrect and shows them the card. The student repeats the process, only this time looking at the card while spelling it out loud and tracing each letter on the mat. When finished, the student copies the word onto their practice page, but does not place a check next to it.
The teacher continues working through the deck until all cards have been used. The student folds their paper back so that both the first and second columns are hidden. The teacher scrambles the card pile and repeats the process for rounds two and three.
When the student has completed their three practices, the partners switch roles and begin again.
Once both students have completed their three practice rounds, it’s time to chart success. Students open their folders to their fluency graphs and record a check mark for each time they spelled a word correctly on their own.
After charting their success, students write sentences independently. Using a single-sided practice sheet, students choose two words from their list and write a sentence using each.
Note: Younger students can simply copy the example sentences from their word cards while older students should be challenged to create their own sentences.


The keys to managing Spelling Fluency folders
Updating folders and cards can take a good amount of time and effort. However, I want to share a few tips that make the process much easier.
Once students have mastered a word, it is removed from their envelope and a new word is added. If you write down every word missed from the initial spelling assessment on each student’s list, it will be easy to see which word needs to be added next. You’ll thank yourself later for doing this ahead of time!
Establish a place for students to turn in folders and cards that need to be updated. In my classroom, I set out a large basket for folders and a smaller one next to it for cards. When a student mastered a word, they took that card out of their folder, placed the card in the small basket and the folder in the large basket. This system was easy for students to learn and follow and kept the mess and confusion to a minimum!
Have multiple sets of cards ready to go. This job is perfect for parent volunteers! Typically, students will use the same words in their practice, but not all at the same time. Before starting Spelling Fluency, I made 5-10 copies of each word card on cardstock, cut them out, and had them ready to use throughout the year.
Making Spelling Fluency work in your classroom
In my classroom, I taught spelling in small groups rather than as a whole group. In my experience, this is ideal as it allows students to receive personalized instruction that fits their needs. Spelling instruction and practice can take place during a dedicated block of time or within a writing block during station work.
You may not be able to find dedicated time for spelling instruction - especially if you teach multiple classes. If you’re wondering how to fit Spelling Fluency into your current schedule, I suggest doing so during centers or station work. Once students understand the process, it requires no additional instruction on your part.
Spelling Fluency can be completely student managed! And when you utilize volunteers to manage folders, using this highly effective, multisensory approach to helping students improve spelling accuracy is a breeze!
Closing note…
Now you know more about how to incorporate a Spelling Fluency practice into your spelling instruction. And how easy it can be to manage and maintain this practice throughout the school year. Study after study shows just how effective multisensory instruction is, especially for students who need remediation or extra support. I hope you’re feeling inspired to bring Spelling Fluency practice to your students this year!
Looking for more spelling help? Find additional posts here.
Click the image below to save these ideas for later: